Creating workspaces to manage multiple projects
If you're just getting started, we recommend creating a single project instead of a workspace with multiple projects.
If you need to collaborate with multiple teams, or work with conflicting dependencies that require isolation from each other, you can scaffold a workspace directory that contains multiple projects, each with their own separate Python environment, while still being able to access all of your assets across every project in a single instance of the Dagster UI or dg CLI.
A workspace directory contains a root dg.toml file with workspace-level settings, and a projects directory with one or more projects. It also contains a Python environment in a deployments/local folder that can be used for running dg commands locally against the workspace.
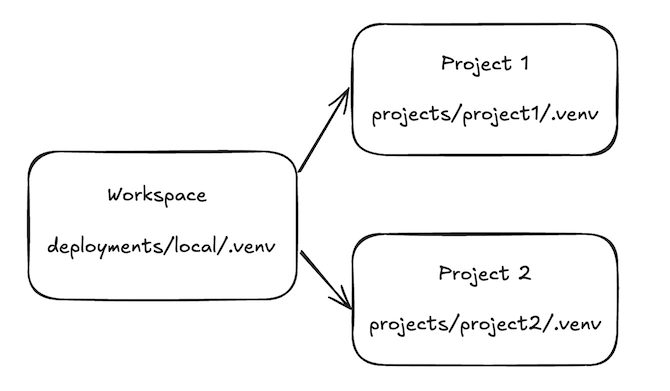
When a dg command runs in a workspace, it will create a subprocess for each project using that project's virtual environment, and communicate with each process through an API layer. The diagram below demonstrates a workspace with two projects, as well as their virtual environments.
If you are a Dagster+ user, you can scaffold deployment configuration files for the workspace and all projects contained in it by running dg plus deploy configure in the workspace root directory.
For a full list of options, including Git provider specification, see the dg plus deploy configure API docs.
Creating a new workspace and first project
To scaffold a new workspace called dagster-workspace, run uvx create-dagster@latest workspace and respond yes to the prompt to run uv sync after scaffolding:
uvx create-dagster workspace dagster-workspace && cd dagster-workspace
The scaffolded workspace includes a projects folder, which is currently empty, and a deployments folder, which includes a local folder with a pyproject.toml file that specifies an environment for running dg commands locally against your workspace.
Next, enter the directory and activate the virtual environment for the local environment:
source deployments/local/.venv/bin/activate
You'll need to activate this virtual environment anytime you open a new terminal session and want to run a dg command against the workspace.
Now we'll create a project inside our workspace called project-1. Run uvx create-dagster@latest project with the path of the project:
uvx create-dagster project projects/project-1
Creating a Dagster project at /.../dagster-workspace/projects/project-1.
Scaffolded files for Dagster project at /.../dagster-workspace/projects/project-1.
A `uv` installation was detected. Run `uv sync`? This will create a uv.lock file and the virtual environment you need to activate in order to work on this project. If you wish to use a non-uv package manager, choose "n". (y/n) [y]: Running `uv sync --group dev`...
...
This will create a new Python environment for this project and associate that project with the workspace.
Workspace structure
The new workspace has the following structure:
tree
.
├── deployments
│   └── local
│       ├── pyproject.toml
│       └── uv.lock
├── dg.toml
└── projects
    └── project-1
        ├── pyproject.toml
        ├── src
        │   └── project_1
        │       ├── __init__.py
        │       ├── definitions.py
        │       └── defs
        │           └── __init__.py
        ├── tests
        │   └── __init__.py
        └── uv.lock

...
The dg.toml file for the dagster-workspace folder contains a directory_type = "workspace" setting that marks this directory as a workspace:
directory_type = "workspace"

[workspace]

[[workspace.projects]]
path = "projects/project-1"
project-1 also contains a virtual environment directory called .venv that is not shown above. This environment is managed by uv and its contents are specified in the uv.lock file.
The project-1 directory contains a pyproject.toml file with a
tool.dg.directory_type = "project" section that defines it as a dg project:
...
[tool.dg]
directory_type = "project"

[tool.dg.project]
root_module = "project_1"
...
Adding a second project to the workspace
As noted above, environments are scoped per project. dg commands will only use the environment of project-1 when you are inside the project-1 directory.
Let's create another project:
uvx create-dagster project projects/project-2
Creating a Dagster project at /.../dagster-workspace/projects/project-2.
Scaffolded files for Dagster project at /.../dagster-workspace/projects/project-2.
A `uv` installation was detected. Run `uv sync`? This will create a uv.lock file and the virtual environment you need to activate in order to work on this project. If you wish to use a non-uv package manager, choose "n". (y/n) [y]: Running `uv sync --group dev`...
...
Now there are two projects. You can list them with:
dg list project
projects/project-1
projects/project-2
The workspace now has the following structure:
Loading the projects in the workspace
Finally, let's load our two projects with dg dev. When you run dg dev from the workspace root, it will automatically recognize the projects in your workspace and launch each project in a separate process in its virtual environment found in the .venv folder in the project.
dg dev