Configuring Okta SCIM provisioning
In this guide, we'll walk you through configuring Okta SCIM provisioning for Dagster+.
Dagster+ currently supports the following attributes for SCIM syncing:
user.firstNameuser.lastNameuser.email, which must match the user's username in Oktauser.displayName
Prerequisites
To complete the steps in this guide, you'll need:
- To have set up Okta SSO for Dagster+. For more information, see the Okta SSO setup guide.
- Permissions in Okta that allow you to configure applications.
- The following in Dagster+:
- A Pro plan
- Organization Admin permissions in your organization
Step 1: Enable SCIM provisioning in Dagster+
- Sign in to your Dagster+ account.
- Click the user menu (your icon) > Organization Settings.
- Click the Provisioning tab.
- If SCIM provisioning isn't enabled, click the Enable SCIM provisioning button to enable it.
- Click Create SCIM token to create an API token. This token will be used to authenticate requests from Okta to Dagster+.
Keep the API token handy - you'll need it in the next step.
Step 2: Enable SCIM provisioning in Okta
-
Sign in to your Okta Admin Dashboard.
-
Using the sidebar, click Applications > Applications.
-
Click the Dagster+ app. If you haven't set up SSO for Okta, follow this guide to do so before continuing.
-
Click the Sign On tab and complete the following:
-
Click Edit.
-
In the Advanced Sign-on Settings section, enter the name of your organization in the Organization field.
-
In the Credential Details section, set the Application username format field to Email:

- Click Save.
-
-
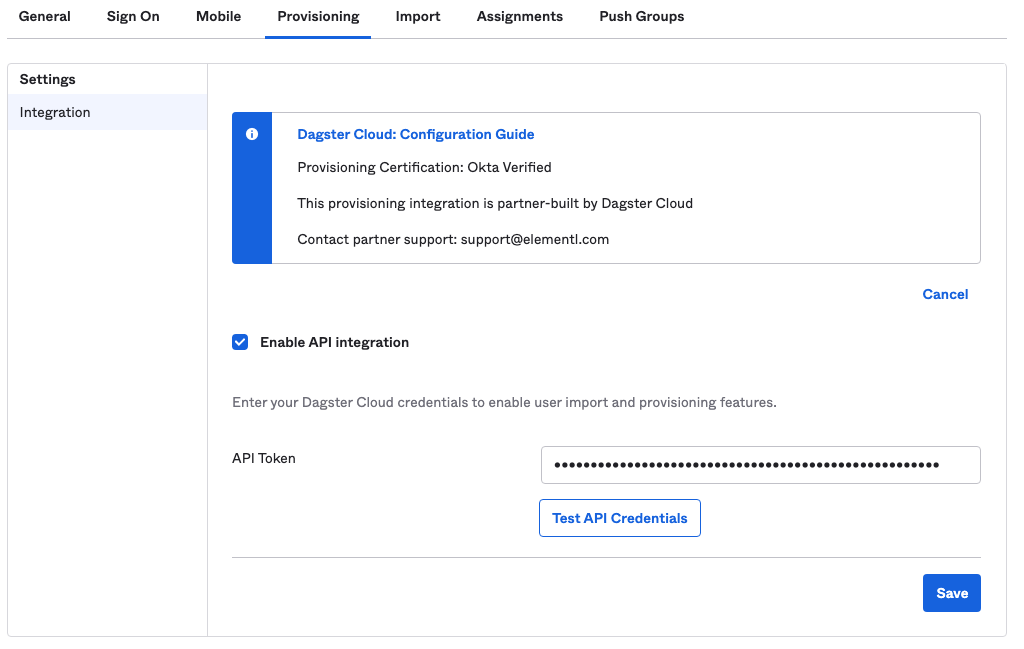
Click the Provisioning tab and complete the following:
-
Click Configure API Integration.
-
Check the Enable API integration checkbox that displays.
-
In the API Token field, paste the Dagster+ API token you generated in Step 1:
-
Click Test API Credentials to verify that your organization and API token work correctly.
-
When finished, click Save.
-
Step 3: Enable user syncing in Okta
After you confirm that your API credentials work in the Dagster+ Okta application, you can enable user syncing:
-
In the Dagster+ Okta app, click the Provisioning tab.
-
In the Settings panel, click To App.
-
Click Edit.
-
Next to Create Users, check the Enable checkbox:
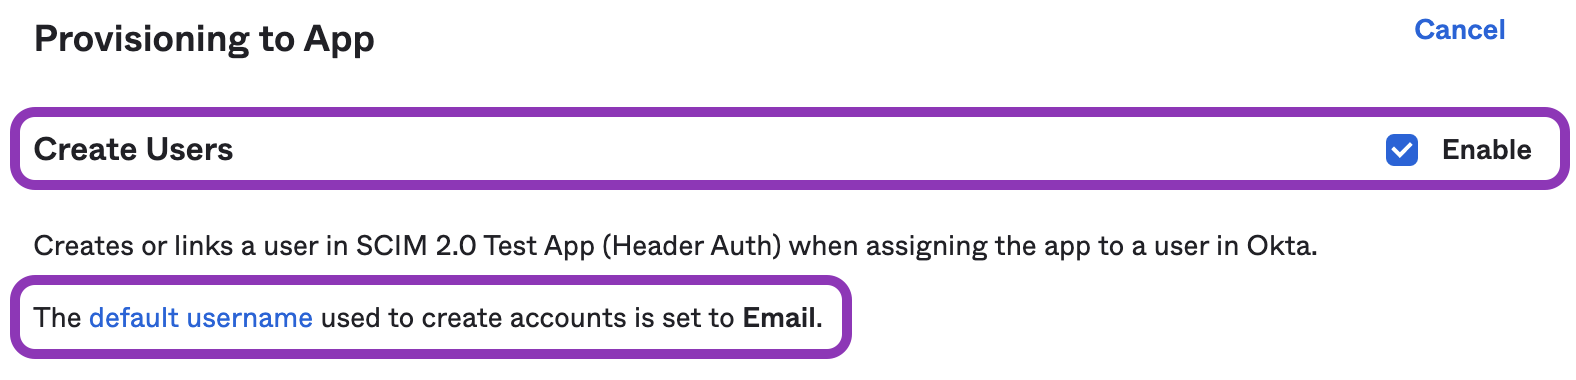
Note that the default username used to create accounts must be set to "Email" or user provisioning may not work correctly.
-
Optionally, check Enable next to Update User Attributes and Deactivate Users to enable these features.
-
When finished, click Save.
Step 4: Enable group syncing in Okta
This step is required only if you want to sync Okta user groups to Dagster+ as Teams.
When Push groups is enabled in Okta, you can sync user groups from Okta to Dagster+ as Teams. Refer to the Okta documentation for setup instructions.
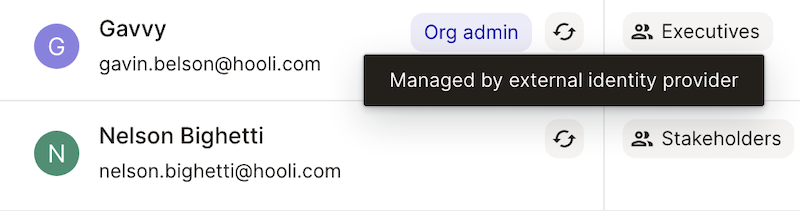
Once Okta successfully syncs users to Dagster+, synced users will have a 'synced' icon next to them in the Dagster+ users page:
Next steps
For more information on how user and team management works when SCIM provisioning is enabled, see the main page of this section.